Navigating the Challenges of Medical Image Processing: A Guide for the Discouraged
When I first ventured into the realm of medical image processing, I was filled with excitement and curiosity. However, that enthusiasm quickly turned into discouragement when I realized that the common image processing pipelines I had learned were not directly applicable to medical images. Why does such functionality not exist? This question lingered in my mind, prompting me to create this post—and a notebook—for those who, like me, are eager to tackle medical imaging problems but feel overwhelmed.
Understanding the Unique Landscape of Medical Imaging
In previous discussions, we explored medical image segmentation and delved into the intricacies of coordinate systems and DICOM files. My experience in this field has led me to emphasize the importance of data understanding, preprocessing, and augmentation. As I often say, merely understanding your data without grasping its unique characteristics is akin to playing bingo. In medical imaging, specific data manipulations are critical for effective preprocessing and augmentation, which are foundational to state-of-the-art methods.
To facilitate this understanding, I have provided a notebook that allows users to experiment with transformations on medical images, which are essentially 3D structured grids.
Getting Started with Medical Image Data
For our exploration, we will work with two MRI images sourced from the nibabel Python library, stored as nifty files. Before diving into transformations, let’s write some code to visualize these 3D medical volumes. The images will be displayed in three planes: sagittal, coronal, and axial.
Visualizing Two-Dimensional Planes
Throughout this tutorial, we will utilize a function that visualizes the median slices in all three planes. Here’s a minimal implementation:
def show_mid_slice(img_numpy, title='img'):
    """
    Accepts a 3D numpy array and shows median slices in all three planes
    """
    assert img_numpy.ndim == 3
    n_i, n_j, n_k = img_numpy.shape
    center_i1 = int((n_i - 1) / 2)
    center_j1 = int((n_j - 1) / 2)
    center_k1 = int((n_k - 1) / 2)
    show_slices([img_numpy[center_i1, :, :],
                  img_numpy[:, center_j1, :],
                  img_numpy[:, :, center_k1]])
    plt.suptitle(title)

def show_slices(slices):
    """
    Function to display a row of image slices
    Input is a list of numpy 2D image slices
    """
    fig, axes = plt.subplots(1, len(slices))
    for i, slice in enumerate(slices):
        axes[i].imshow(slice.T, cmap="gray", origin="lower")
This code leverages matplotlib’s imshow and numpy’s array manipulations to visualize the images in grayscale, as medical images typically consist of a single channel.
Initial MRI Images
Now, let’s visualize our two MRI images:
show_mid_slice(epi_img_numpy, 'First Image')
show_mid_slice(anatomy_img_numpy, 'Second Image')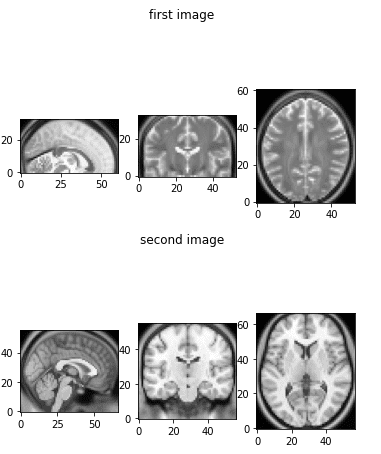
With our images ready, we can proceed to explore various transformations, starting with resizing and rescaling.
Medical Image Resizing (Down/Up-Sampling)
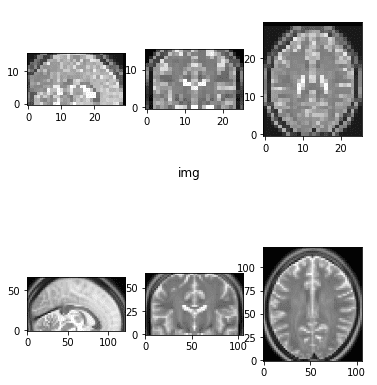
The SciPy library offers numerous functionalities for multi-dimensional images. For our purposes, we will use scipy.ndimage.interpolation.zoom to resize the image. This function can be employed for both downsampling and interpolation to increase spatial dimensions.
Here’s how we can implement resizing:
import scipy

def resize_data_volume_by_scale(data, scale):
    """
    Resize the data based on the provided scale
    """
    scale_list = [scale, scale, scale]
    return scipy.ndimage.interpolation.zoom(data, scale_list, order=0)

result = resize_data_volume_by_scale(epi_img_numpy, 0.5)  # Downsample
result2 = resize_data_volume_by_scale(epi_img_numpy, 2)    # Upsample
This scaling is referred to as isometric, and maintaining the ratios is crucial to preserve anatomical structures.
Medical Image Rescaling (Zoom In/Out)
Rescaling can be viewed as an affine transformation. Randomly zooming in and out of the image can help the model learn scale-invariant features. Here’s a simple implementation:
def random_zoom(matrix, min_percentage=0.7, max_percentage=1.2):
    z = np.random.sample() * (max_percentage - min_percentage) + min_percentage
    zoom_matrix = np.array([[z, 0, 0, 0],
                             [0, z, 0, 0],
                             [0, 0, z, 0],
                             [0, 0, 0, 1]])
    return ndimage.interpolation.affine_transform(matrix, zoom_matrix)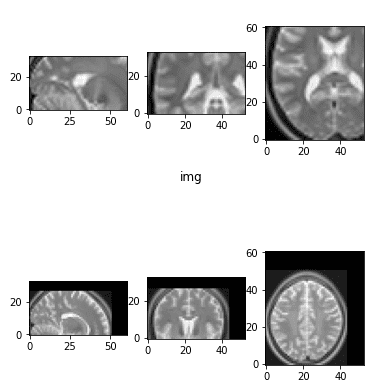
Medical Image Rotation
Rotation is a prevalent method for data augmentation in computer vision, and it holds equal importance in medical imaging. A simple random 3D rotation can be implemented as follows:
def random_rotate3D(img_numpy, min_angle, max_angle):
    """
    Returns a random rotated array in the same shape
    :param img_numpy: 3D numpy array
    :param min_angle: in degrees
    :param max_angle: in degrees
    """
    assert img_numpy.ndim == 3, "provide a 3D numpy array"
    assert min_angle < max_angle, "min should be less than max val"
    assert min_angle > -360 or max_angle < 360
    all_axes = [(1, 0), (1, 2), (0, 2)]
    angle = np.random.randint(low=min_angle, high=max_angle + 1)
    axes_random_id = np.random.randint(low=0, high=len(all_axes))
    axes = all_axes[axes_random_id]
    return scipy.ndimage.rotate(img_numpy, angle, axes=axes)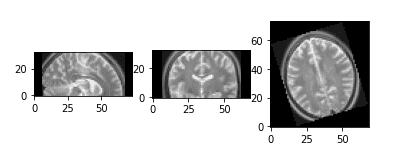
Medical Image Flipping
Flipping images along axes is another common augmentation technique. It’s crucial to apply similar operations to the ground truth data, especially in tasks like medical image segmentation. Here’s how to implement random flipping:
def random_flip(img, label=None):
    axes = [0, 1, 2]
    rand = np.random.randint(0, 3)
    img = flip_axis(img, axes[rand])
    img = np.squeeze(img)
    if label is None:
        return img
    else:
        y = flip_axis(y, axes[rand])
        y = np.squeeze(y)
    return x, y

def flip_axis(x, axis):
    x = np.asarray(x).swapaxes(axis, 0)
    x = x[::-1, ...]
    x = x.swapaxes(0, axis)
    return x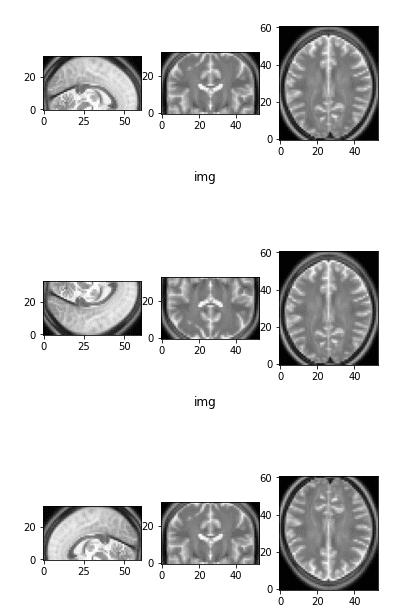
Medical Image Shifting (Displacement)
Shifting, along with rotation and scaling, falls under affine transformations. Here’s how to implement random shifting:
def random_shift(img_numpy, max_percentage=0.4):
    dim1, dim2, dim3 = img_numpy.shape
    m1, m2, m3 = int(dim1 * max_percentage / 2), int(dim1 * max_percentage / 2), int(dim1 * max_percentage / 2)
    d1 = np.random.randint(-m1, m1)
    d2 = np.random.randint(-m2, m2)
    d3 = np.random.randint(-m3, m3)
    return transform_matrix_offset_center_3d(img_numpy, d1, d2, d3)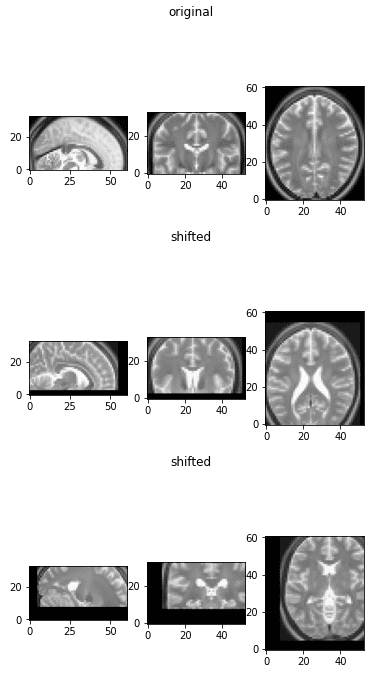
Random 3D Crop
Cropping is similar to natural images, but care must be taken to ensure that all slices are included. Here’s how to implement random cropping:
def crop_3d_volume(img_tensor, crop_dim, crop_size):
    assert img_tensor.ndim == 3, '3D tensor must be provided'
    full_dim1, full_dim2, full_dim3 = img_tensor.shape
    slices_crop, w_crop, h_crop = crop_dim
    dim1, dim2, dim3 = crop_size
    if full_dim1 == dim1:
        img_tensor = img_tensor[:, w_crop:w_crop + dim2, h_crop:h_crop + dim3]
    elif full_dim2 == dim2:
        img_tensor = img_tensor[slices_crop:slices_crop + dim1, :, h_crop:h_crop + dim3]
    elif full_dim3 == dim3:
        img_tensor = img_tensor[slices_crop:slices_crop + dim1, w_crop:w_crop + dim2, :]
    else:
        img_tensor = img_tensor[slices_crop:slices_crop + dim1, w_crop:w_crop + dim2, h_crop:h_crop + dim3]
    return img_tensor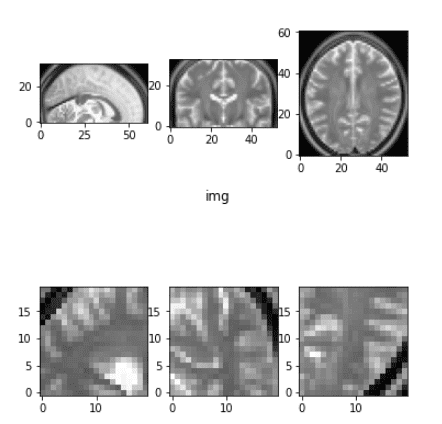
Clipping Intensity Values (Outliers)
While this step may not be applicable for all types of medical images, it can be useful, particularly for CT images. Here’s how to clip intensity values based on percentiles:
def percentile_clip(img_numpy, min_val=5, max_val=95):
    """Intensity normalization based on percentile"""
    low = np.percentile(img_numpy, min_val)
    high = np.percentile(img_numpy, max_val)
    img_numpy[img_numpy < low] = low
    img_numpy[img_numpy > high] = high
    return img_numpy
Intensity Normalization in Medical Images
Intensity normalization is crucial in medical imaging. Here’s how to implement min-max and mean/std normalization:
def normalize_intensity(img_tensor, normalization="mean"):
    """Accepts an image tensor and normalizes it"""
    if normalization == "mean":
        mask = img_tensor.ne(0.0)
        desired = img_tensor[mask]
        mean_val, std_val = desired.mean(), desired.std()
        img_tensor = (img_tensor - mean_val) / std_val
    elif normalization == "max":
        MAX, MIN = img_tensor.max(), img_tensor.min()
        img_tensor = (img_tensor - MIN) / (MAX - MIN)
    return img_tensor
Elastic Deformation
Elastic deformation is a powerful augmentation technique that allows the network to learn invariance to deformations. Here’s a simplified implementation:
def elastic_transform_3d(image, labels=None, alpha=4, sigma=35, bg_val=0.1):
    """Elastic deformation of images"""
    assert image.ndim == 3
    shape = image.shape
    dtype = image.dtype
    coords = np.arange(shape[0]), np.arange(shape[1]), np.arange(shape[2])
    im_intrps = RegularGridInterpolator(coords, image, method="linear", bounds_error=False, fill_value=bg_val)
    dx = gaussian_filter((np.random.rand(*shape) * 2 - 1), sigma, mode="constant", cval=0.) * alpha
    dy = gaussian_filter((np.random.rand(*shape) * 2 - 1), sigma, mode="constant", cval=0.) * alpha
    dz = gaussian_filter((np.random.rand(*shape) * 2 - 1), sigma, mode="constant", cval=0.) * alpha
    x, y, z = np.mgrid[0:shape[0], 0:shape[1], 0:shape[2]]
    indices = np.reshape(x + dx, (-1, 1)), np.reshape(y + dy, (-1, 1)), np.reshape(z + dz, (-1, 1))
    image = np.empty(shape=image.shape, dtype=dtype)
    image = im_intrps(indices).reshape(shape)
    if labels is not None:
        lab_intrp = RegularGridInterpolator(coords, labels, method="nearest", bounds_error=False, fill_value=0)
        labels = lab_intrp(indices).reshape(shape).astype(labels.dtype)
        return image, labels
    return image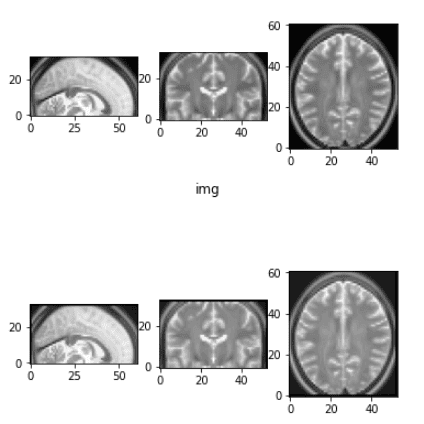
Conclusion
By now, you should resonate with the unique challenges and opportunities presented by medical imaging preprocessing and augmentations. Understanding these transformations is crucial for anyone looking to make strides in this field. I encourage you to explore the notebook online and experiment with the transformations yourself.
If you found this tutorial helpful, please consider sharing it on your social media platforms. Your support is greatly appreciated!
Stay tuned for more insightful articles from AI Summer!
Deep Learning in Production Book 📖
Learn how to build, train, deploy, scale, and maintain deep learning models. Understand ML infrastructure and MLOps using hands-on examples. Learn more.
Disclosure: Please note that some of the links above might be affiliate links, and at no additional cost to you, we will earn a commission if you decide to make a purchase after clicking through.
